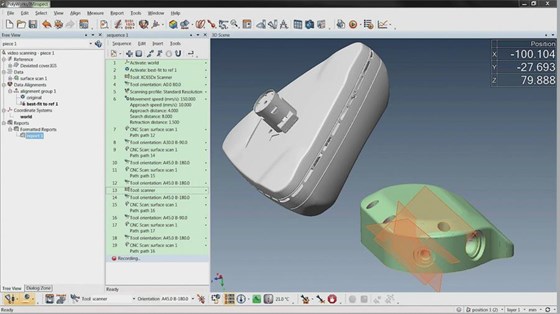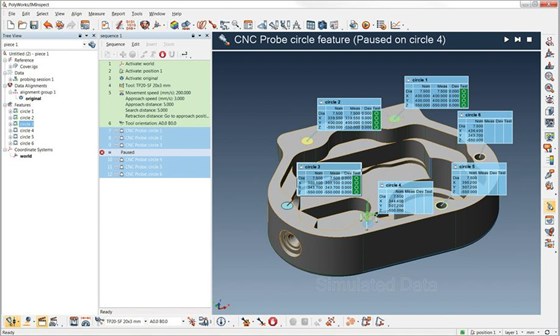
PolyWorks 2016’s measurement sequence editor lets operators use drag-and-drop to change the order of measurement operations, control device moves, trigger CMM-specific operations, add prompts and images, and define conditional operations.

PolyWorks’ offline simulation functions automatically generate simulated point cloud data and probed points from CAD geometry. Operators can simulate measured object components, data alignments, data color maps, geometry control tables, 3D-scene snapshots and inspection reports before the real task of inspection measurement.

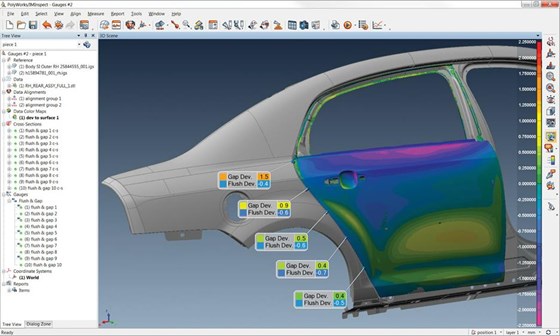
Texture mapping technology helps produce easier-to-understand color maps and improve the display speed of those maps and the interpolation of deviation colors.
Previous
Next
Related:
Digital Domain
Better quality starts with better measurement, and better measurement often starts with a plethora of measurement devices. Controlling these devices and then massaging the data output into meaningful inspections takes software. Inspection software continues to take on an increasingly larger role early in the manufacturing process, starting with connection, measurement, inspection and data analysis. The latest releases of inspection software are compressing the time-consuming tasks of connecting to measurement devices, creating measurement plans and presenting measurement data. Here’s an example: PolyWorks 2016, the latest release from InnovMetric Software (innovmetric.com).
Universality reigns
PolyWorks is a 3D metrology software package that supports any metrology device: portable and stationary computer numerical control (CNC) coordinate measuring machines (CMMs), including probing and laser scanning. “The first dimension of the PolyWorks universality consists of delivering a digitizing hub that can interface with all 3D metrology devices used by our customers,†says Marc Soucy, president of InnovMetric. The universal nature of the “digitizing hub†is a challenge, he continues, because “some measurement devices require contact with the measured surfaces, while others use optical, non-contact measurement principles. Some measurement devices are driven by operators; others are operated in a fully automated mode.â€
However, the universality in PolyWorks is not limited just to the communications between inspection software and measurement devices. It also applies to creating universal workflows for performing inspection tasks. Case in point: Only minimal changes are needed to adapt a PolyWorks inspection project from one measurement device to another. Soucy lists several reasons why this level of universality is appealing, starting with “it minimizes the costs of software ownership. First, the cost of training is reduced because there is only one platform to master. Second, a standard platform facilitates broader collaboration between different teams, possibly located in different lands and even different countries. Third, a universal platform ensures consistency in your measurement results. Last, a universal platform increases mobility. PolyWorks lets anyone measure anywhere with nearly any hardware device with minimal training.â€
Making inspection routine
Two new features in PolyWorks 2016 help in the ability to “reuse inspection projects with different measurement devices from different vendors that possibly use different measurement principles,†says Soucy.
Start with the PolyWorks Play Inspection tool, which can automatically generate step-by-step measurement sequences to capture part inspection data using portable metrology devices. The measurement sequence editor introduced in PolyWorks 2016 lets operators customize the automatically generated sequences, including changing the order of measurement operations (using drag-and-drop), control device position moves, trigger CMM-specific operations (such as moving the probe head to a specific location or reorienting the probe), add prompts and images, define conditional operations, and insert macro scripts. Intelligence in the sequence editor watches for mistakes, such as if the operator should delete a step, and will activate an error message, prevent the deletion and recommend a solution.
Creating repeatable measurement sequences tailored to immediate inspection needs improves the efficiency of metrology operations on the shop floor and minimizes hiccups in those measurement routines performed by an operator. In PolyWorks 2016, this can be done without the need for macro scripts. That said, users can still define and use macro scripts in PolyWorks 2016 for advanced inspection sequences, data analysis, reporting and other customizations.
The PolyWorks sequence editor also lets operators control the measurement context, that is, the exact conditions of measurement. By triggering the object measurement in the editor, the resulting inspection sequence can activate the appropriate alignment of the coordinate systems and device positions.
Offline speeds on-line inspection
PolyWorks 2016 lets inspectors define a measurement plan without being physically connected to a specific measurement device, as well as specify geometry controls on measurement objects, prepare inspection reports and review measured object geometry controls and reports or multipiece inspection results through built-in statistical process control functionality.
The software package’s new offline simulation functions automatically generate simulated point cloud data and probed points from the nominal geometry of a CAD model of a part. In fact, says Soucy, “operators can set up inspection projects even if they don’t have access to a measurement device or a real 3D dataset of a part.†For instance, operators can simulate measured object components, data alignments, data color maps, geometry control tables, 3D-scene snapshots and inspection reports before the real measurement task. Offline simulation works for CNC CMMs as well, letting users control the probing and laser scanning tool orientations and trajectories on a virtual device.
When using offline simulation, the operator selects the measurement device, aligns the simulated probing by using the reference targets on the simulated geometry and replicates the typical measurement workflow. “As soon as you probe, you can see that the measurements are quickly simulated. This is one of the advantages of the simulation mode: The measurements are actually faster than when performed with the real device,†jokes Soucy.
In addition, inspectors can group sets of features and quickly match surrounding measured data points to the CAD model. This capability optimizes the alignments of extracted features against flexible and highly deviated parts. Another improvement is in iteratively measuring trimmed and hemmed edges, thereby improving the accuracy of a measured surface and edge deviations in parts significantly deviated from the nominal reference. Last, PolyWorks 2016 uses texture mapping to fill pixels with color when zooming in on color maps. This helps produce better, easier-to-understand color maps, and it improves the display speed of the data-to-CAD deviation color map and interpolation of deviation colors. Inspection software has never become as routine as it can be now—from software that is hardly routine itself. Â


